Super Simple Gimbal (SSG) par Crezze sur RCG
Posté : sam. 5 janv. 2013 17:43
Hello,
Un super petit sujet pour une nacelle facile à réaliser et qui ne coute pas grand chose, c'est Crezze de RCG qui la propose.
Voici une copie de son message, visible ICI
Un super petit sujet pour une nacelle facile à réaliser et qui ne coute pas grand chose, c'est Crezze de RCG qui la propose.
Voici une copie de son message, visible ICI
Here is my Super Simple Gimbal design for those who want to try out a gimbal with minimal cost and minimal additional weight to an aerial platform.
Specification:
Gimbal weight: 45g inc servos
Camera weight: Tested up to 95g (Gopro 2)
Servos: Mini servos (plastic gears are fine)
Gimbal control: KK2 board with brontide's modified V1.5 Firmware
Components: From your scrap bin
Platform: Will fit almost any aerial platform including fixed wing (use OpenAero firmware)
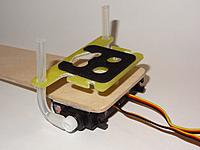
Features: Anti-vibe silicone mount design
I first tested the design with a V-Tail mixer to achieve the correct servo movements but found it had very low resolution resulting in servo 'jitter'. After a plea for help on the KK2 forum, brontide kindly modified KK's Gimbal V1.5 code to include the servo mixing on CH7 & CH8. The servos now work much more smoothly and even more weight, complexity and money is saved.
This is a very simple gimbal that works really well with most small cameras, the only downside is that it can only react once a movement has been detected by the control board so it will always show very small roll and tilt motions in the video. However with a bit of deshaker these can almost be completely eliminated - see the last part of the video.
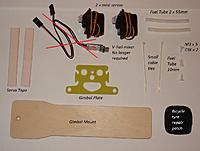
Component list
2 x mini servos - almost any spec will do but must be the same (I used Hitec HS81's)
Double sided servo tape
Standard RC fuel tube (must be new or unused with no fuel residue)
Small cable ties (the smallest you can find)
M3 x 5 countersink screws (I used nylon)
1 x thin rubber pad (a self adhesive bicycle puncture repair patch works well)
1 x scrap of pcb board, carbon sheet or thin ply for the gimbal plate, dimensions here in the pdf.
3mm ply or similar for the gimbal mount.
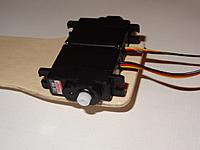
Probably the hardest part of this build is cutting out the gimbal plate. The 'ears' are not completely necessary but make it easier for the rubber band to fit around.
The mount plate should be 50mm wide at its widest point but all the dimensions may need to change if your mini servos are much bigger than HS81's.
Setup
After installing brontide's KK2 code fit the right hand servo connector (looking from the rear of the craft) to CH7 and the left servo connector to CH8 on the KK2 board.
Now power up the board and set the following in the Camera Stab Settings menu:
Roll gain: -850
Roll offset: 50
Pitch gain: 800
Pitch offset: 10
These settings work great for Hitec HS81 servos but you may need to play about with the numbers for different servos.
Remove all props from your multirotor and power up the motors to activate the gimbal. With your multirotor on a level surface, adjust the servo horns to achieve a level gimbal plate (or as i prefer slightly pointed down a bit).
Install your camera with a rubber band or velcro and go fly.
